

Please note: I may earn commissions from qualifying purchases if you shop through links on this page. More info.
10 Practical Garden Planning Tips for Beginners
Planning a beautiful and functional landscape is an exciting project—but skipping key steps early on can lead to costly mistakes and missed opportunities. From taking measurements to thinking through how you’ll actually use the space, every detail matters.
In this article, I’ll share practical garden planning tips to help you design a space that fits your vision, your lifestyle and your needs.
If you’d rather watch than read, check out my YouTube video on this topic.
Subscribe to my YouTube channel for more gardening videos!
1: Collect Inspiration Photos to Define Your Vision

One of the best ways to start planning your garden is by gathering inspiration photos. This will help you visualize the look and feel you’re after, making it much easier to make design decisions as you go.
I always recommend doing some research ahead of time. You can visit local gardens and snap photos, flip through magazines, or browse online platforms like Pinterest, Houzz or Google. The more images you collect, the clearer your personal style and preferences will become.
As you review your photos, look for patterns.
Are there colors, styles or types of plants that keep appearing? What elements stand out to you, and how might you bring those into your own space?
This inspiration-gathering phase is essential to designing a garden you’ll truly love. It gives you a solid foundation and helps you confidently guide your design choices.
2: Always Measure Your Space First

Getting accurate measurements is one of the most important steps in garden planning. It helps you make the best use of your space, choose the right plants and materials, and avoid costly surprises when it’s time to install.
I get it—measuring can feel daunting, and it’s the step most DIYers want to skip. But skipping this step is one of the main reasons DIY landscape designs fall short. I can honestly say I don’t know a single professional designer who would work without measurements, which shows just how essential it is.
In my Plant Perfect Activity Book, I walk you through this process in detail, including my favorite time-saving method—the running measurement, which makes site measuring a whole lot easier.

By measuring your space upfront, you’ll gain the confidence that your design will work in real life, and you’ll be able to maximize the space you have without guessing or second-guessing when it comes time to install.
Free Guide: 13 Pro Garden Design Tips

Unlock the secrets to a stunning garden with my free guide: 13 Pro Garden Design Tips! From creating flow and balance to choosing the perfect plants, these expert tips will help you transform your outdoor space with ease. Download now to get started!
3: Sketch Your Garden Layout to Visualize Your Space
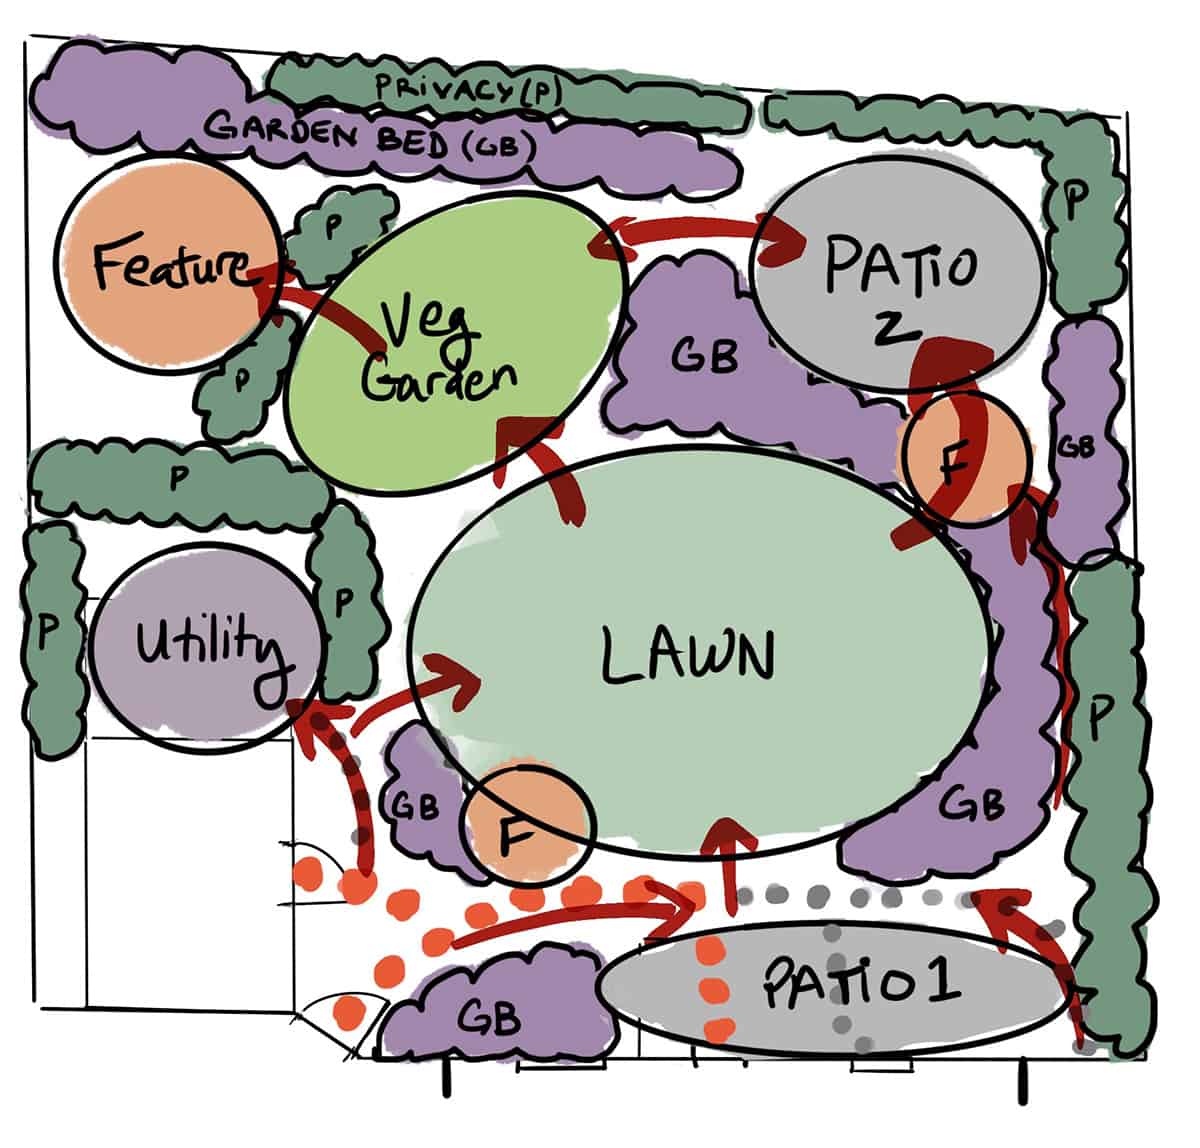
Drawing your garden design is a crucial step that helps you see how all the elements of your plan will fit together. It’s your chance to create a layout that brings your ideas to life while optimizing space, function and aesthetics.
This is where you can take all those wishlist items and see how they’ll work in your actual space. Plus, sketching your plan—whether on paper or digitally—makes it easy to move things around, experiment with different configurations and refine your design before any shovels hit the ground. It’s a creative, cost-effective way to make sure your vision works before making any big commitments.
If you want a step-by-step article for doing this, check out: Bubble Drawings for Landscape Design: From Ideas to Layout
Here’s a simple breakdown of the process:
- Measure your property
- Create a site inventory
- Mark primary and secondary paths in your layout
- Place features and focal points
- Incorporate your must-haves
- Fill in negative space
- Create paths and flow
- Refine the drawing
- Select your plants
For a complete step-by-step guide, check out my Plant Perfect Activity Book or head to my article: Design a Garden Layout. I also have a complete article on how to create a landscape bubble drawing.
Remember, this is the fun part—so don’t be afraid to play around and explore different ideas. The more you experiment now, the more confident you’ll feel when it’s time to bring your design to life.
4: Plan Generous Spaces for Comfort and Flexibility

When designing your garden, give yourself enough space to move, dine and relax comfortably. Planning generous garden beds, paths and patios ensures your outdoor space feels welcoming and functional—not cramped or awkward.
This is why I always recommend drawing out a plan and creating a wishlist first. It helps you visualize how much space you really need for the activities you want to enjoy. If areas are too small, you might find yourself avoiding the space altogether. My article about lines of force can help you to determine the placement of these wishlist items.
Whenever possible, plan for slightly larger spaces than you think you’ll need. Even if you don’t fully use them right away, having the option to grow into them later can save you both time and money.
As a rule of thumb, do a little research on the ideal sizes for beds, paths and patios before you finalize your design.
You can find these key measurements in my Sizing and Specs Mistakes article, which will help you make confident choices and create a space that feels just right.
5: Design Your Garden Around How You’ll Use It

One of the best ways to create a garden you’ll love is to design it around how you actually want to use the space. It might sound obvious, but it’s surprisingly common for DIYers to end up with impractical designs that don’t match their needs or lifestyle.
That’s why it’s so important to reflect on how you intend to enjoy your garden.
Ask yourself: What do I want this space to do for me?
Is it for entertaining, playing with kids, relaxing, growing vegetables, creating a dog-friendly area, or simply enjoying flowers?
When you clarify your needs upfront, you can tailor your design to fit those activities, ensuring your outdoor space is both practical and enjoyable.
In my Garden Style Mood Board Workshop, I walk you through the exact process I use to help clients define their wishlist items and style preferences. This process makes it easy to create a beautiful, personalized space that’s designed for the way you’ll actually live in and use it.
You can learn this process too—check out my Mood Board Workshop here.
Additional Flower Garden Planning Tips to Consider
Account For Sun And Shade
Observe how sunlight moves through your yard. Place plants and features where they will thrive—sun-loving plants in bright areas, shade-tolerant ones in cooler spots. This planning ensures a healthy, vibrant garden.
Set a Budget and Prioritize
Establish a realistic budget and break it into phases if necessary. Start with essential elements like paths or major planting areas, and add extras like lighting or decor later. Prioritizing ensures your garden plan is achievable.
Plan for Maintenance Needs
Be realistic about how much time you want to spend maintaining your garden. Choose low-maintenance plants or hardscape elements if you prefer a hands-off approach, or incorporate features like irrigation systems to make upkeep easier.
Incorporate Vertical Space
Maximize your space by thinking vertically! Use trellises, hanging planters, or climbing plants to add dimension and interest. Vertical gardening is especially valuable for smaller spaces.
Include Seasonal Interest
Design a garden that looks beautiful year-round. Choose plants with varying bloom times, evergreen foliage, or interesting textures to ensure your garden shines in every season.
Don’t Skip the Planning Stage
If you’re serious about crafting a garden that reflects your vision—not a generic layout—check out my shrubhub review for a cautionary tale about what can go wrong with services that skip this kind of thoughtful planning.
Liked what you read? Dive deeper with: 70+ Shockingly Common Landscape Design Mistakes (& How to Fix Them)
More Landscape Design Articles You’ll Love
- Bubble Drawings for Landscape Design: From Ideas to Layout
 Learn how a simple landscape bubble drawing or diagram can help you map out ideas, organize spaces and bring clarity to your yard design process.
- Using Lines of Force (Regulating Lines) to Structure Your LandscapeLearn how to use bubble diagrams and lines of force to transform your yard into a cohesive, functional landscape that flows with your home.
- 14 Budget-Friendly Landscaping Tips to Save Money
 Design your dream landscape on a budget with these cost-saving tips that won’t sacrifice style or curb appeal.


